Eindelijk! Na vele uren geklooi werkt eindelijk mijn windroos in Annex BASIC op de ESP32-C3! Het programma is netjes opgedeeld. Er wordt een extern JavaScript bestand “script_naaldrotatie.js” aangeroepen, er zijn twee routines: WEBPAGE voor het opbouwen van de webpagina en DIRECTION voor het bepalen van de richting van de windrichtingmeter.
// De functie om de polygon te roteren

function rotateMe(rotatieHoek) {
    const polygon = document.getElementById('mijnPolygon');
    const cx = 250;
    const cy = 250;
    const transformString = `rotate(${rotatieHoek}, ${cx}, ${cy})`;
    polygon.setAttribute('transform', transformString);
}
Het JavaScript krijgt een waarde voor rotatieHoek van de windrichtingmeter.
'Windroos_final_1.bas

PIN.MODE 0, INPUT, PULLUP
PIN.MODE 1, INPUT, PULLUP
PIN.MODE 2, INPUT, PULLUP
PIN.MODE 3, INPUT, PULLUP

dir = 0

jsexternal "/script_naaldrotatie.js"              'points to a required external javascript file

onhtmlreload WEBPAGE

timer0 1000, DIRECTION 'get DIRECTION every second
wait


'#########################
WEBPAGE:
'#########################
cls

A$ = ""
A$ = A$ + |<!DOCTYPE html>|
A$ = A$ + |<html lang="nl">|
A$ = A$ + |<head>|
A$ = A$ + |    <title>SVG Polygon Rotatie</title>|
A$ = A$ + |    <style>|
A$ = A$ + |        svg {|
A$ = A$ + |            border: 1px solid black;|
A$ = A$ + |        }|
A$ = A$ + |    </style>|
A$ = A$ + |</head>|
A$ = A$ + |<body>|
A$ = A$ + ||
A$ = A$ + |    <h2>Windrichting</h2>|
A$ = A$ + ||
A$ = A$ + |    <svg width="500" height="500">|

a$ = a$ + |  <circle r="250" cx="250" cy="250" fill="white" stroke="black" stroke-width="1" />|
a$ = a$ + |  <circle r="200" cx="250" cy="250" fill="white" stroke="black" stroke-width="3" />|
a$ = a$ + |  <circle r="7" cx="250" cy="250" fill="black" stroke="black" stroke-width="1" />|

a$ = a$ + |  <text x="240" y="40" fill="red" font-size="28">N</text>|
a$ = a$ + |  <text x="390" y="100" fill="red" font-size="28">NO</text>|
a$ = a$ + |  <text x="455" y="255" fill="red" font-size="28">O</text>|
a$ = a$ + |  <text x="390" y="430" fill="red" font-size="28">ZO</text>|
a$ = a$ + |  <text x="240" y="485" fill="red" font-size="28">Z</text>|
a$ = a$ + |  <text x="70" y="430" fill="red" font-size="28">ZW</text>|
a$ = a$ + |  <text x="15" y="255" fill="red" font-size="28">W</text>|
a$ = a$ + |  <text x="70" y="100" fill="red" font-size="28">NW</text>|
a$ = a$ + |  <line x1="50" y1="250" x2="450" y2="250" style="stroke:red;stroke-width:1" />|
a$ = a$ + |  <line x1="250" y1="80" x2="250" y2="450" style="stroke:red;stroke-width:1" />|
a$ = a$ + |  <line x1="110" y1="110" x2="395" y2="390" style="stroke:red;stroke-width:1" />|
a$ = a$ + |  <line x1="110" y1="390" x2="395" y2="110" style="stroke:red;stroke-width:1" />|

A$ = A$ + |        <polygon id="mijnPolygon" points="250,50 270,250 230,250" style="fill:red;stroke:black;stroke-width:1" />|
A$ = A$ + |        |
A$ = A$ + |        <circle cx="250" cy="250" r="5" fill="blue" />|
A$ = A$ + |        |
A$ = A$ + |    </svg>|
A$ = A$ + ||
A$ = A$ + ||
A$ = A$ + |</body>|
A$ = A$ + |</html>|
html A$
return


'#########################
DIRECTION:
'#########################
A = pin(0)
B = pin(1)
C = pin(2)
D = pin(3)
IF (A = 0) AND (B = 1) AND (C = 1) AND (D = 1) THEN
  wlog "Noord"
  dir = 0
END IF
IF (A = 0) AND (B = 0) AND (C = 1) AND (D = 1) THEN
  wlog "Noord-Oost"
  dir = 45
END IF
IF (A = 1) AND (B = 0) AND (C = 1) AND (D = 1) THEN
  wlog "Oost"
  dir = 90
END IF
IF (A = 1) AND (B = 0) AND (C = 0) AND (D = 1) THEN
  wlog "Zuid-Oost"
  dir = 135
END IF
IF (A = 1) AND (B = 1) AND (C = 0) AND (D = 1) THEN
  wlog "Zuid"
  dir = 180
END IF
IF (A = 1) AND (B = 1) AND (C = 0) AND (D = 0) THEN
  wlog "Zuid-West"
  dir = 225
END IF
IF (A = 1) AND (B = 1) AND (C = 1) AND (D = 0) THEN
  wlog "West"
  dir = 270
END IF
IF (A = 0) AND (B = 1) AND (C = 1) AND (D = 0) THEN
  wlog "Noord-West"
  dir = 315
END IF

jscall "rotateMe(" ;dir; ")"
'wlog "Waarde dir ", dir

pause 500

return
En dan het resultaat!

Nu nog kijken hoe het programma zelfstartend gemaakt moet worden.
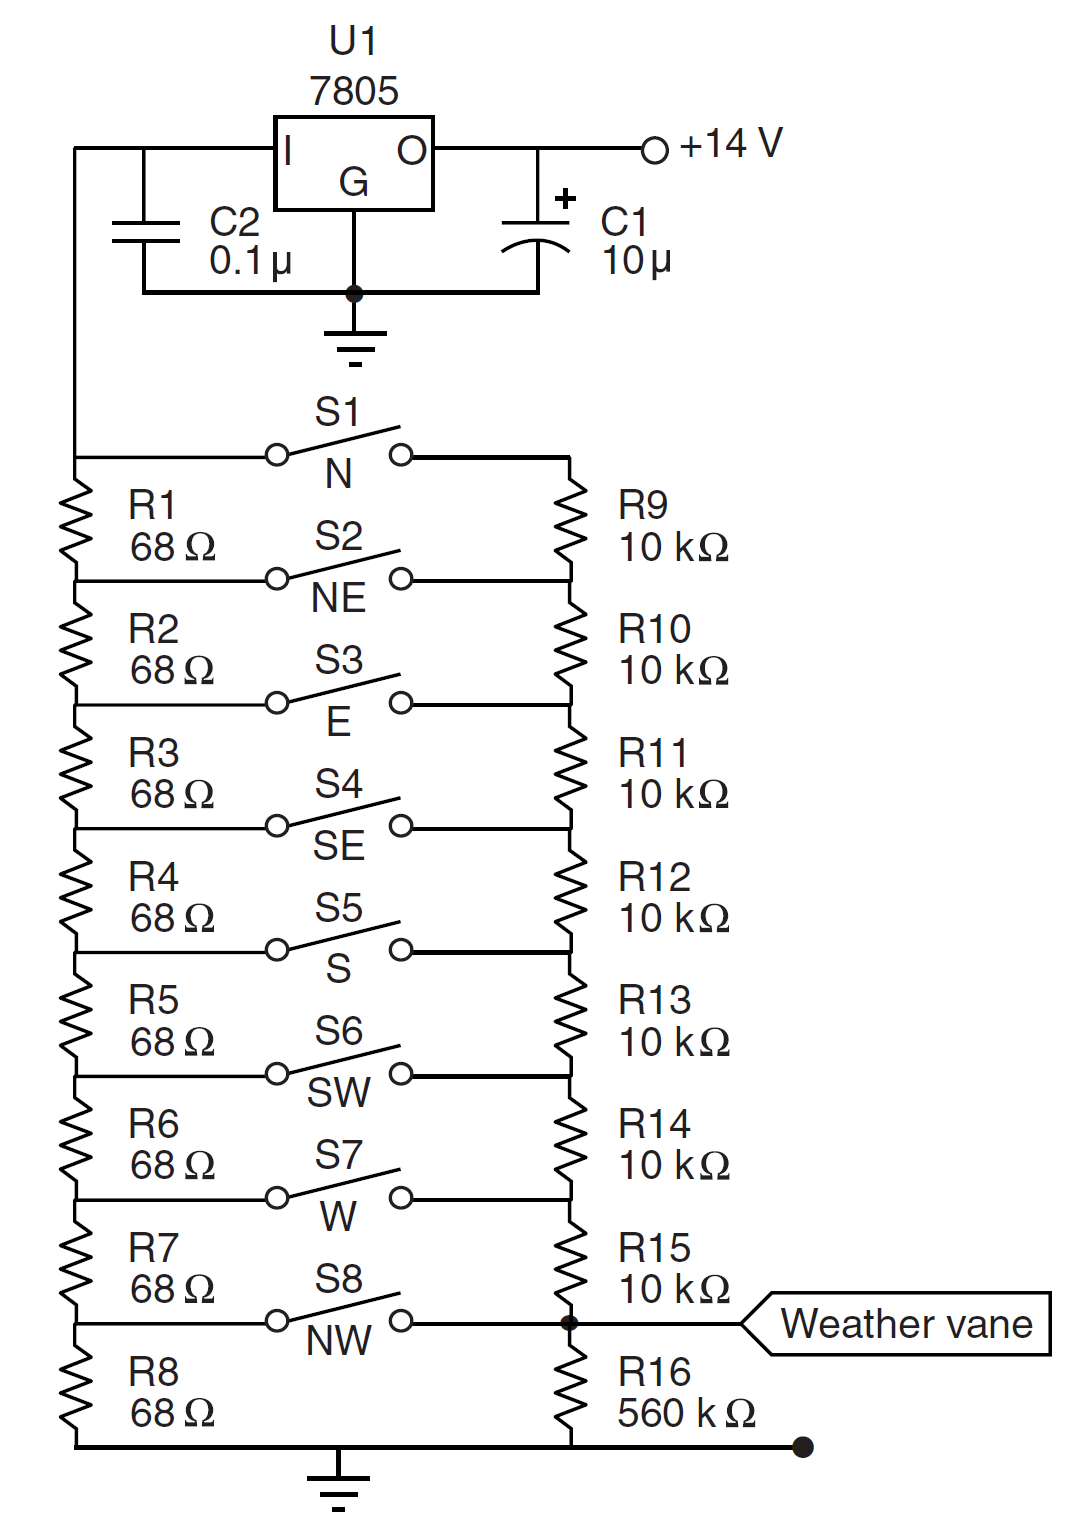
In een oude Circuit Cellar (2000) kwam ik bovenstaand schema tegen: S1 tm S8 zijn reed relais. Op de schacht van de windrichting meter is slechts één magneet gemonteerd. Deze kan ook maar een schakelaar per keer omzetten. De weerstanden vormen een spanningsdeler en afhankelijk van de schakelaar komt er spanning op de uitgang (label “Weather vane”) te staan die door een microcontroller uitgelezen kan worden en zo dus de windrichting uitleest.